This article has been written for the HCC!Forth interessegroep in The Netherlands.
This is the second version of this article.
It looks best with Mozilla Firefox.
The first version was presented by Leon Konings to the HCC!Forth interessegroep on 8/14/2010.
Website: http://www.forth.hccnet.nl/
Preface
Leiden, 14 september 2010
Chuck Moore together with some friends has started the new company Green Arrays, Inc.
In this company a lot of work is being done to create new "Multicore Processors".
On the website you can find simulators for their chips.
These can be downloaded freely.
First I will describe, where to find the installation package.
In a tutorial the reader can write a short arrayForth program.
During this process the reader will learn to work with the editor.
After this the program will be tested in a simulator.
At the same time the reader will learn some properties of the simulator.
arrayForth is written in colorForth.
The editor and simulator are also written in colorForth.
I might amend this article in future.
This article has been written with the "ActionOutline" editor of Green Parrots: http://www.greenparrots.com/.
Look for more information at:
http://www.greenarraychips.com/home/documents/greg/cf-intro.htm
I am still a beginner using colorForth.
Feedback is very welcome.
Leon Konings
+31 (0)71 5216531
In my experience arrayForth works fine on Microsoft Windows XP/Vista.
The version used in this article is for the GA144:
http://www.greenarraychips.com/home/documents/greg/code/af-34k2-ga144-1-10-PD.zip
You can download the most recent version from:
http://www.greenarraychips.com/home/documents/greg/cf-releases.htm
In this tutorial we use the qwerty keyboard.
I myself like to use the dvorak keyboard now, but when I started this tutorial I didn't.
For a newbie (like me) it is probably better to use the qwerty keyboard first.
Don't try to learn to many new things at once!
Start C:\Forth\ga144\Okad2-41-pd.exe.
You are now looking at ColorForth.
This version contains the simulator for the GA144-1.10 chip.
If you close the console window(The other window with only text) the ColorForth window is closed too. Use Ctrl-C to close this window.
A simple alternative in the ColorForth window:
Type: bye
In case of typing errors:
Type: <backspace> (Push the backspace key!)
Type the word again. It is not possible to correct single characters after the first one.
Type: <esc> (Press the escape key!)
If you typed something already press the <backspace> key first!
Let's test if it works:
Type: 1 <space> 2 <enter>
The spacebar and enter key do the same thing.
The stack is shown in the lower left corner using yellow characters.
Stack: 1 2
Type: +
Stack: 1 2 123 (123 means +)
Type: <space>
Stack: 3
Type: <F1>
In the lowerright corner "hex" appears.
Type: 1d5
You can see 1d5 on de stack.
Type: <F1>
Now you see the decimal representation on the stack: 469
<F1> toggles between decimal and hexadecimal and vice versa.
Writing a program using arrayForth is not simple.
The ColorForth editor and the GA144 chips are both very innovative.
For this tutorial I have created a simple program.
The simple function f(x) = 2(x+3) + 3(x+5) wil be executed by three processors in parallel.
These processors are called "nodes".
The results are put on the stack in the fourth processor.
To be watched in the simulator.
The nodes are numbered. For the GA144:
lower left = 000
lower right = 017
upper left = 700
upper right = 717
The matrix has 8 rows and 18 columns, and looks like this:
700 701 702 703 704 705 706 707 708 709 710 711 712 713 714 715 716 717
600 601 602 603 604 605 606 607 608 609 610 611 612 613 614 615 616 617
500 501 502 503 504 505 506 507 508 509 510 511 512 513 514 515 516 517
400 401 402 403 404 405 406 407 408 409 410 411 412 413 414 415 416 417
300 301 302 303 304 305 306 307 308 309 310 311 312 313 314 315 316 317
200 201 202 203 204 205 206 207 208 209 210 211 212 213 214 215 216 217
100 101 102 103 104 105 106 107 108 109 110 111 112 113 114 115 116 117
000 001 002 003 004 005 006 007 008 009 010 011 012 013 014 015 016 017
The ports are the connections between the nodes.
They are called: left up down right
Every node is connected in this way to four neighbours.
In case a node is at the edge, the node can have a
connection with the outside world. (I/O)
Up = hex 145
Down = hex 115
up
700 701 702 703 704 705 706 707 708 709 710 711 712 713 714 715 716 717
down
600 601 602 603 604 605 606 607 608 609 610 611 612 613 614 615 616 617
up
500 501 502 503 504 505 506 507 508 509 510 511 512 513 514 515 516 517
down
400 401 402 403 404 405 406 407 408 409 410 411 412 413 414 415 416 417
up
300 301 302 303 304 305 306 307 308 309 310 311 312 313 314 315 316 317
down
200 201 202 203 204 205 206 207 208 209 210 211 212 213 214 215 216 217
up
100 101 102 103 104 105 106 107 108 109 110 111 112 113 114 115 116 117
down
000 001 002 003 004 005 006 007 008 009 010 011 012 013 014 015 016 017
up
Left = 175
Right = 1d5
700 701 702 703 704 705 706 707 708 709 710 711 712 713 714 715 716 717
600 601 602 603 604 605 606 607 608 609 610 611 612 613 614 615 616 617
l 500 r 501 l 502 r 503 l 504 r 505 l 506 r 507 l 508 r 509 l 510 r 511 l 512 r 513 l 514 r 515 l 516 r 517 l
e 400 i 401 e 402 i 403 e 404 i 405 e 406 i 407 e 408 i 409 e 410 i 411 e 412 i 413 e 414 i 415 e 416 i 417 e
f 300 g 301 f 302 g 303 f 304 g 305 f 306 g 307 f 308 g 309 f 310 g 311 f 312 g 313 f 314 g 315 f 316 g 317 f
t 200 h 201 t 202 h 203 t 204 h 205 t 206 h 207 t 208 h 209 t 210 h 211 t 212 h 213 t 214 h 215 t 216 h 217 t
100 t 101 102 t 103 104 t 105 106 t 107 108 t 109 110 t 111 112 t 113 114 t 115 116 t 117
000 001 002 003 004 005 006 007 008 009 010 011 012 013 014 015 016 017
We are using two blocks for every node.
The first node contains the program.
The second node is the "shadow block" and is used for comment.
First we open blok 200.
Type: 200 <space> edit <space>
The editor is active. At the lower right a block of yellow text appears:
t yrgx
cdfj ludr
ab k -mc+
x.i
Type: <space>
The yellow block of text disappears. The editor is inactive.
Type: e
The yellow block is back. The editor is active.
The keys:
t yrgx
cdfj ludr
ab k -mc+
x.i
Are hints for the keys to press on a qwerty keyboard:
r uiop
asdf jkl;
zx v m,./
n <space> <alt>
This block of tekst shows the meaning of certain keys in the ColorForth editor.
cdfj corresponds to the keys: asdf
ludr corresponds to the keys: jkl;
etcetera...
In this tutorial we say for example:
Type: a{c}
In this case you should type: a
{c} is the ColorForth meaning of the character a.
calc1
Start writing the program.
First the name:
Type: r{t} calc1 <space> <esc>
The name is comment. Comment is colored white.
The orange "pacman" cursor is behind calc1.
Remove this word again:
Type: n{x}
The word is now in memory. (In a kind of text stack)
Get it back:
Type: <alt>
It is back again:
calc1
Change the color of the word three times:
Type: a{c}
calc1 Yellow
Type: a{c}
calc1 Green
Type: a{c}
calc1 White
Amongst other things this is handy for for changing a word
to comment, and back again.
calc1 0 org br
Type: e <space> You are back in the editor.
Type: u{y} 0 <space> org <space> <esc>
0 org means that the program in this node starts at address 0.
Yellow text will be executed immediately.
Type: x{b} br <space> <esc>
br in blue gets you two carriage returns.
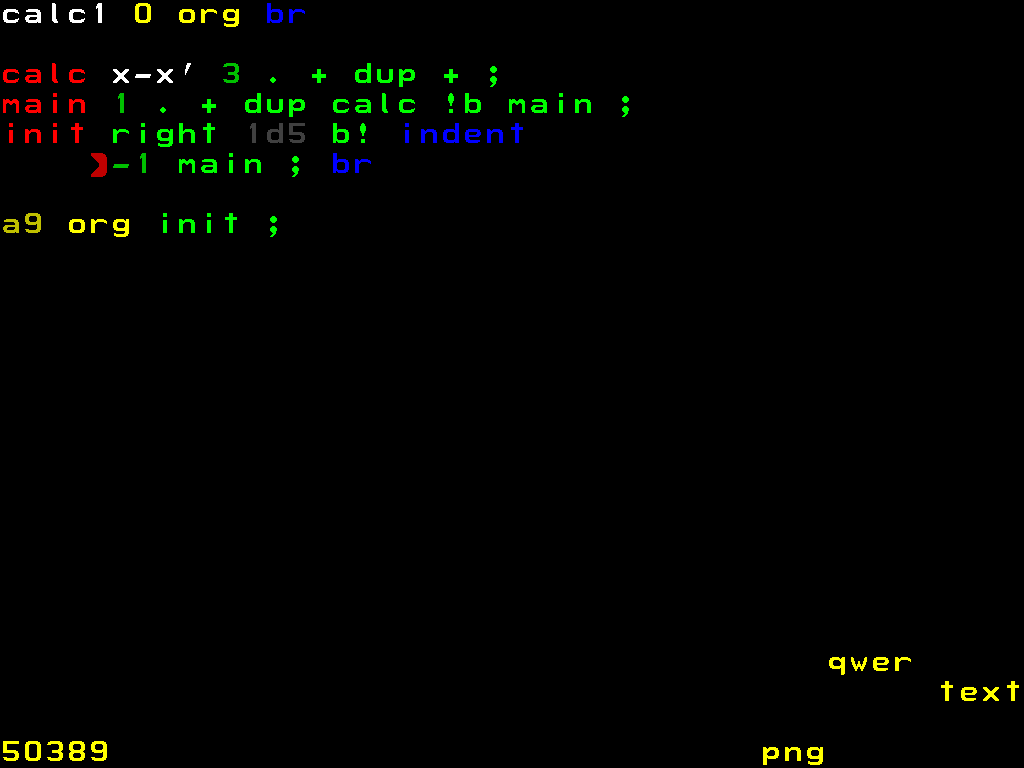
calc x-x' 3 . + dup + ;
This word calculates 2(x+3).
The word name is red:
Type: i{r} calc <space> <esc>
The stack comment is white:
Type: r{t} x-x' <space> <esc>
The remaining part of this word is green:
Type: o{g} 3 <space> . <space>
+ <space> dup <space> + <space> ; <space> <esc>
main 1 . + dup calc !b main ;
This word is recursive. An eternal loop. Main calls main "forever".
The word name is red:
Type: i{r} main <space>
After a red word the editor automatically goes into green mode.
So it is not necessary to type <esc> o{g}.
The remaining part of this word is green:
Type: 1 <space> . <space> + <space>
dup <space> calc <space> !b <space>
main <space> ; <space> <esc>
init right 1d5 b! indent
The word name is red:
Type: i{r} init <space>
The editor automatically goes into green mode.
Type: right <space>
<F1> starts the hex mode.
The 1 in 1d5 starts the num mode.
Type: <F1> 1d5 <space> <F1> b! <space><esc>
1d5 is comment, which is white:
Type: j{l} (The packman is now located after 1d5)
Type: a{c}
1d5 should now be white.
Type: ;{r} (The packman is now located after b!)
indent gives you a carriage return plus indent and is blue:
Type: x{b} indent <space> esc
-1 main ; br
-1 is numeric, but the - gets you into text mode. Type the 1 first!
Type: o{g} 1- <space> main <space> ; <space> <esc>
br in blue gives you two carriage returns:
Type: x{b} br <space> esc
a9 org init ;
This line makes sure the program starts at the word init.
a9 is an hexadecimal number.
<F1> toggles the hex mode.
The a in a9 starts the text mode.
Type a 0 first to prevent this, so type 0a9.
The leading zero disappears automatically.
Type: u{y} <F1> 0a9 <F1> <space> org <space> <esc>
The remaining green words:
Type: g{o} init <space> ; <space> <esc>
Close the editor:
Type: <space>
Save your work:
Type: save <space>
Open the editor:
Type: e
First we open block 200.
The editor remembers the last block we were working on.
Type: e <space>
or
Type: 200 <space> edit <space>
Go to the shadow block.
Type: p{x} <space>
Now we are in block 201. The shadow block.
Type: p{x} <space>
We are back in block 200.
Type: p{x} <space>
We are back again in block 201. The shadow block. All uneven blocks are shadow blocks.
These blocks are meant only for comment.
We are going to put a bit of comment into this block.
calc x 3 + 2*
The text in a shadow block is never executed,
and is only meant to be comment.
calc is red:
Type: i{r} calc <space> <esc>
De rest is comment, so it is white:
Type: r{t} x <space> 3 <space> + <space>
The 2 causes the numeric mode.
This is not our purpose.
The `-character initiates the text mode:
Type: `2* <space> <esc> <space>
You closed the editor just now.
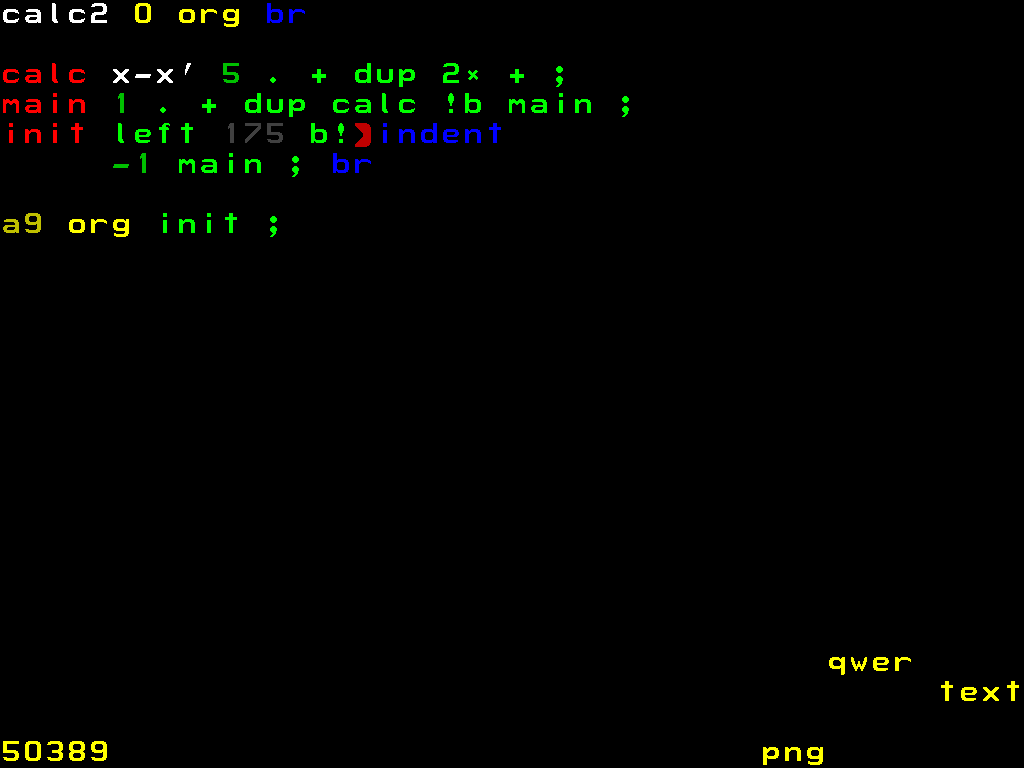
The program calc2 is nearly the same as calc1.
We are going to copy calc1, en change it afterwards.
Go to block 200 first:
Type: 200 <space> edit <space> <space>
or
Type: 200 <space> list <space>
If everything went well, the editor is active now.
Type: 202 <space> copy <space>
We are now in block 202.
The blocks 202 and 203 now contain the same text as 200 en 201.
So the shadow block has been copied too.
Type: e <space> You opened the editor.
Navigating through the block is necessary if you want to change it.
Navigating is done using the ludr {jkl;} keys.
The meaning of these keys is: left - up - down - right
up = 8 x left
down = 8 x right
In case the orange pacman cursor is not visible,
it is best to press the k{u} key until it is.
Type: <space> You closed the editor.
Type: e <space> You are back in the editor.
The keys m{-} and /{+} browse respectively 2 blocks backwards and forwards.
The key p{x} opens the shadow block.
Type: <space> You closed the editor.
calc2 0 org br
Type: e <space> You are back in the editor.
We are going to change the first word:
1. Put pacman behind calc1
2. Type: x{n} (calc1 disappears)
3. Type: r{t} calc2 <space> <esc>
calc x-x' 5 . + dup 2* + ;
1. Put pacman behind 3
2. Type: x{n} (The 3 disappears)
3. Type: o{g} 5 <space> <esc>
1. Put pacman behind dup
2. Type: o{g} `2* <space> <esc>
init left 175 b! indent
1. Put pacman behind right
2. Type: x{n} (right disappears)
3. Type: o{g} left <space> <esc>
1. Put pacman behind 1d5
2. Type: x{n} (1d5 disappears)
3. Type: r{t} <F1> 175 <space> <F1> <esc>
Close the editor:
Type: <space>
Save your work:
Type: save <space>
Open the editor:
Type: e
Open de editor in block 204.
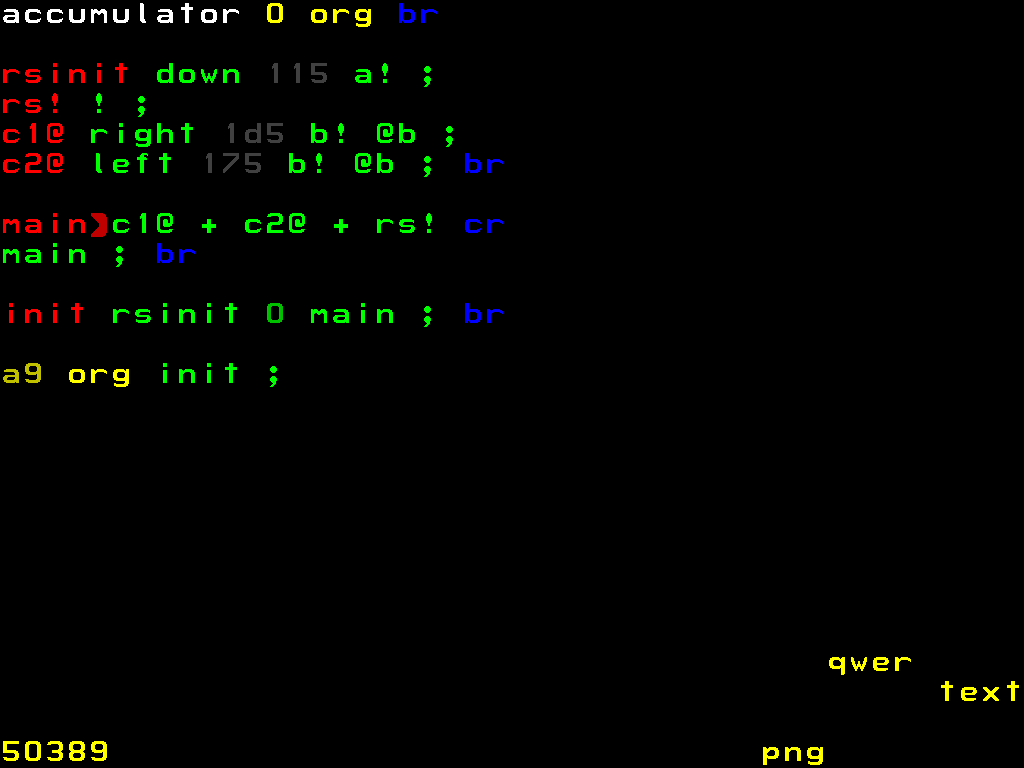
accumulator 0 org br
Type: r{t} accumulator <space> <esc>
Type: y{u} 0 <space> org <space> <esc>
Type: b{x} br <space> <esc>
rsinit down 115 a! ;
Type: i{r} rsinit <space> (The color becomes green)
Type: down <space> a! <space> ; <space> <esc>
Add comment 115 before a!
Type: j(l) j(l)
Type: r{t} <F1> 115 <space> <F1> <esc>
rs! ! ;
Put the pacman behind ";".
Type: i{r} rs! <space> (The color is green now)
Type: ! <space> ; <space> <esc>
c1@ right 1d5 b! @b ;
Type: i{r} c1@ <space> (The color is green now)
Type: right <space> b! <space> @b <space> ; <space> <esc>
Add comment 115 before b!
Type: j(l) j(l) j(l)
Type: r{t} <F1> 1d5 <space> <esc>
This line is partly the same as the next line.
We copy the useful words now:
Type: ;(r) ;(r) ;(r) (The pacman is now located behind the ;)
Type: v{k} v{k} v{k}
The text-stack contains: ; @b b!
c2@ left 175 b! @b ; br
Put the pacman behind ";".
Type: i{r} c2@ <space> (The color is green now)
Type: left <space> <esc>
Type: r{t} <F1> 175 <space> <F1> <esc>
Get the three words from the tekst-stack:
Type: <alt>{i} <alt>{i} <alt>{i} (Now the words b!, @b and ; are pasted into the text.)
Type: b{x} br <space> <esc>
main c1@ + c2@ + rs! 0 cr
main is a recursive word in an eternal loop.
The results will be received from calc1 and calc2, added, and send to results.
Type: i{r} main <space> (The color is green now)
Type: c1@ <space> + <space> c2@ <space> + <space> rs! <space> <esc>
Type: b{x} cr <space> <esc>
main ; br
Type: o{g} main <space> ; <space> <esc>
Type: b{x} br <space> <esc>
init rsinit 0 main ; br
init puts a 0 on the stack and starts main.
Type: i{r} init <space> (The color is green now)
Type: rsinit <space> 0 <space> main <space> ; <esc>
Type: b{x} br <space> <esc>
a9 org init ;
This line makes sure the program starts at the word init.
a9 is an hexadecimal number.
<F1> toggles the hex mode.
The a in a9 starts the text mode.
Type a 0 first to prevent this, so type 0a9.
The leading zero disappears automatically.
Type: u{y} <F1> 0a9 <F1> <space> org <space> <esc>
The remaining green words:
Type: g{o} init <space> ; <space> <esc>
Close the editor:
Type: <space>
Save your work:
Type: save <space>
Open the editor:
Type: e
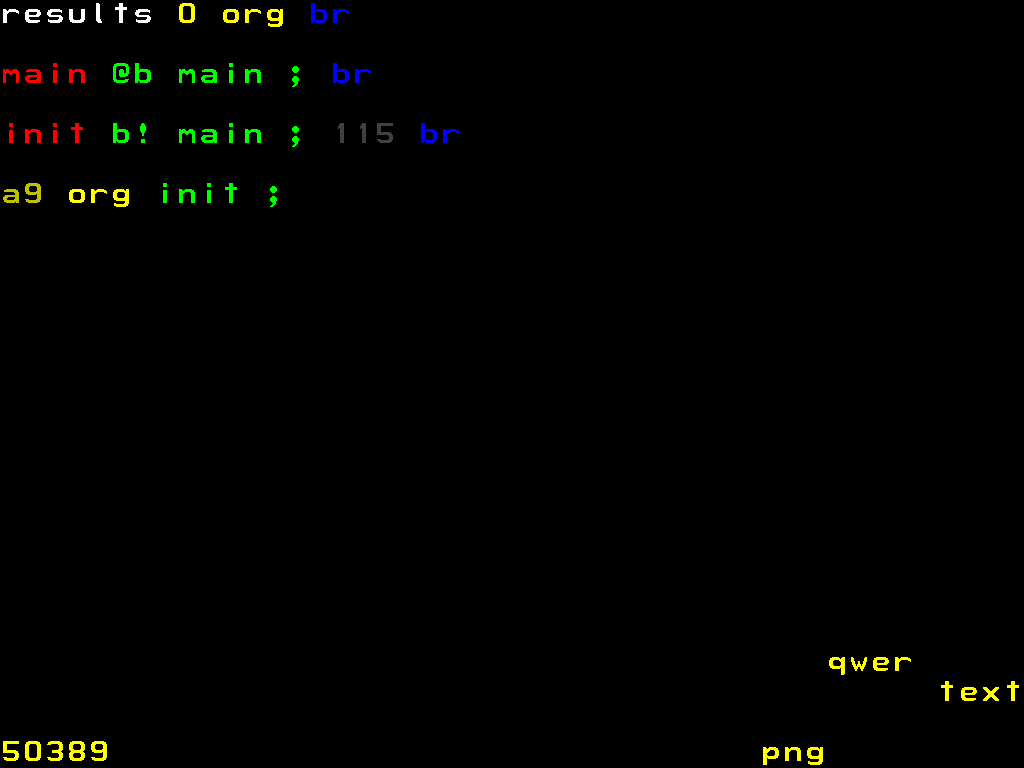
results 0 org br
Type: r{t} results <space> <esc>
Type: y{u} 0 <space> org <space> <esc>
Type: b{x} br <space> <esc>
main @b main ; cr
main is a recursive word in an eternal loop.
The results from the "accumulator" are put on the stack,
we will be able to look at these results in the simulator.
Type: i{r} main <space> (The color is green now)
Type: @b spatiebalk> main <space> ; <space> <esc>
Type: b{x} br <space> <esc>
init down b! main ; 115 br
Type: i{r} init <space> (The color is green now)
Type:b! <space> main <space> ; <space> <esc>
Type: r{t} <F1> 115 <space> <F1> <esc>
Type: b{x} br <space> <esc>
a9 org init ;
This line makes sure the program starts at the word init.
a9 is an hexadecimal number.
<F1> toggles the hex mode.
The a in a9 would start the text mode.
Type a 0 first to prevent this, so type 0a9.
The leading zero disappears automaticly.
Type: u{y} <F1> 0a9 <F1> <space> org <space> <esc>
The remaining green words:
Type: g{o} init <space> ; <space> <esc>
Close the editor:
Type: <space>
Save your work:
Type: save <space>
Open the editor:
Type: e
f(x) = 2(x+3) + 3(x+5)
decimal
calc1 calc2 result
x 2(x+3) 3(x+5) +
0 6 15 21
1 8 18 26
2 10 21 31
3 12 24 36
4 14 27 41
5 16 30 46
6 18 33 51
7 20 36 56
8 22 39 61
9 24 42 66
hex
calc1 calc2 result
x 2(x+3) 3(x+5) +
0 6 f 15
1 8 12 1a
2 a 15 1f
3 c 18 24
4 e 1b 29
5 10 1e 2e
6 12 21 33
7 14 24 38
8 16 27 3d
9 18 2a 42
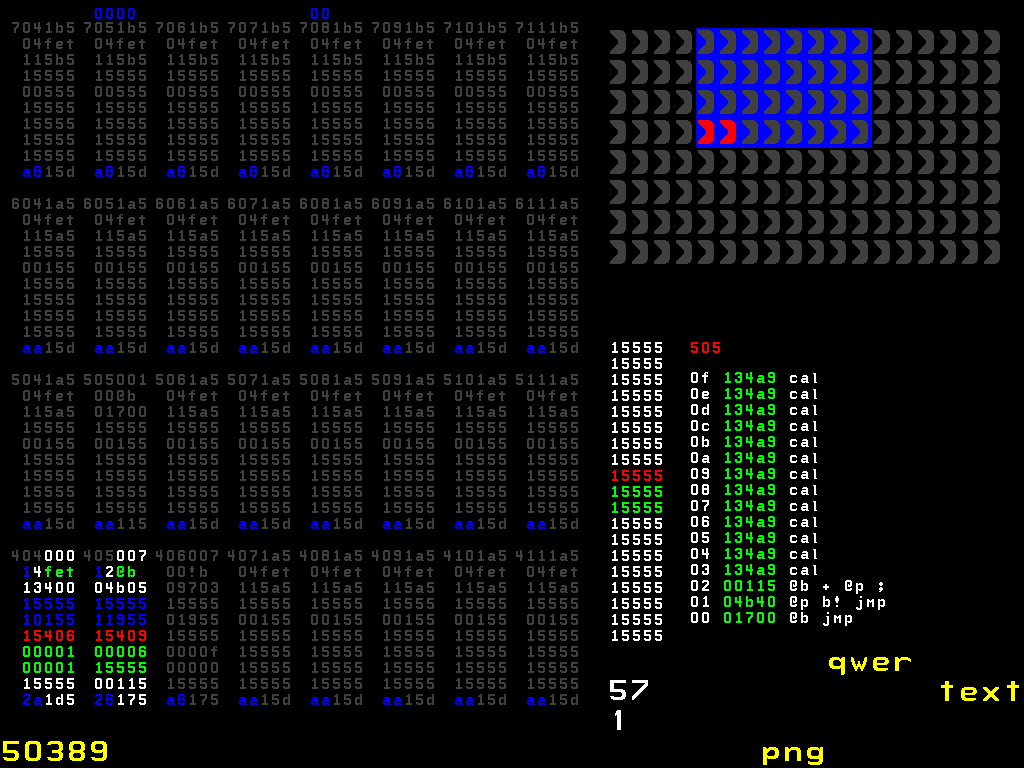
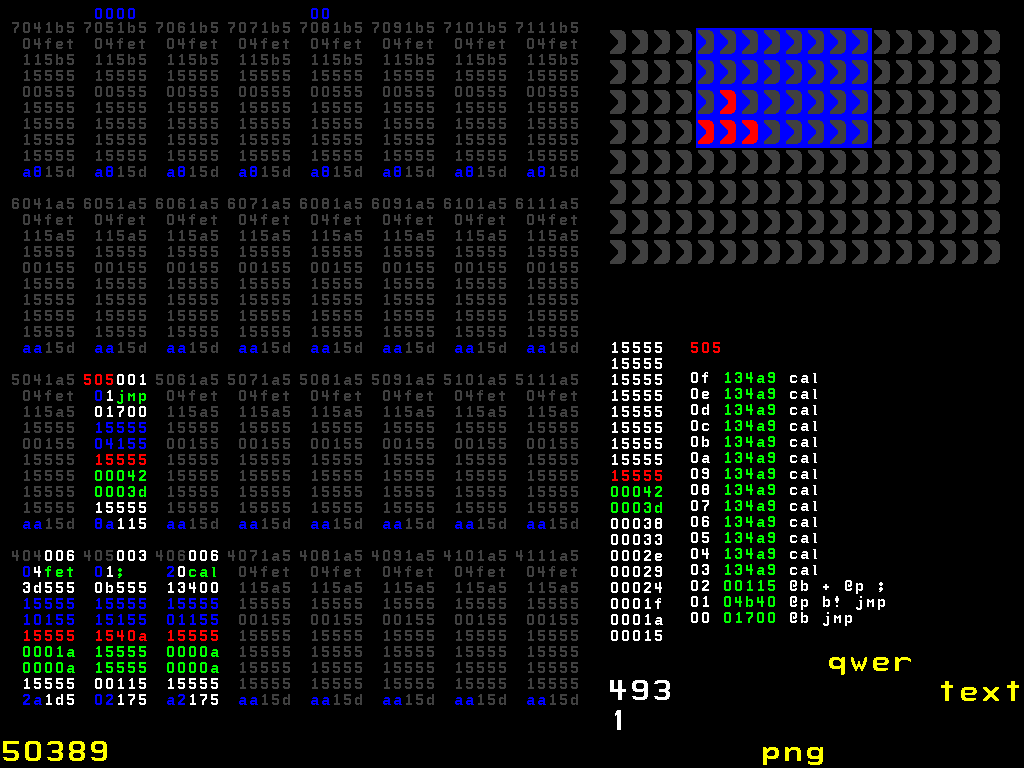
If everyting goes well the results will be on the stack after 493 steps
in the "results" node [505]. These results are of course visible in hexadecimal.
Before step 493 results from calculations will be visible in the other three nodes.
The source we have written, should be called from the simulator.
We use block 1302 for this purpose.
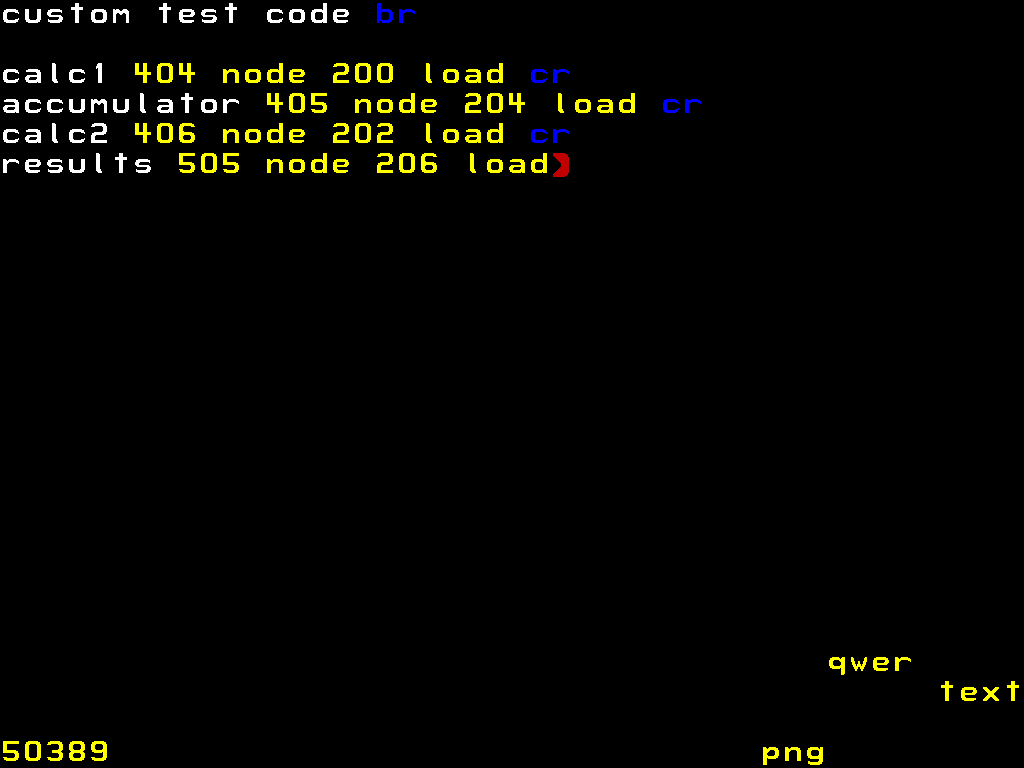
custom test code br
Put the packman behind "code":
Type: x{b} br <space> <esc>
calc1 404 node 200 load cr
Type: r{t} calc1 <space> <esc>
Type: u{y} 404 <space> node <space> 200 <space> load <space> <esc>
Type: x{b} cr <space> <esc>
accumulator 405 node 204 load cr
Type: r{t} accumulator <space> <esc>
Type: u{y} 405 <space> node <space> 204 <space> load <space> <esc>
Type: x{b} cr <space> <esc>
calc2 406 node 202 load cr
Type: r{t} calc2 <space> <esc>
Type: u{y} 406 <space> node <space> 202 <space> load <space> <esc>
Type: x{b} cr <space> <esc>
results 505 node 206 load
Type: r{t} results <space> <esc>
Type: u{y} 505 <space> node <space> 206 <space> load <space> <esc>
Close the editor:
Type: <space>
Save your work:
Type: save <space>
Open the editor:
Type: e
Block 1302 should be open in the editor now.
Browse to block 1300:
Type: m{-}
custom code 1302 load exit br
In line 3 after "custom code 1302 load" you can see the word "exit".
This word is white comment now.
We will turn it into a yellow word:
Put the pacman after exit:
Type: a{c}
This word is activated now.
It has the function of exiting the block immediately.
The remaining part of the code will not be executed.
Close the editor:
Type: <space>
Save your work:
Type: save <space>
Open the editor:
Type: e
Type: so of softsim
You are looking at a nicely colored screen.
To leave the simulator:
Type: <space>
The simulator like the editor shows a block of text in the lower right
corner, from which you can see which keys correspond to which functions.
The keys:
++ ludr
fgs ludr
-- oudw
.
Are hints for the keys to press on a qwerty keyboard:
qw uiop
sdf jkl;
zx m,./
<space>
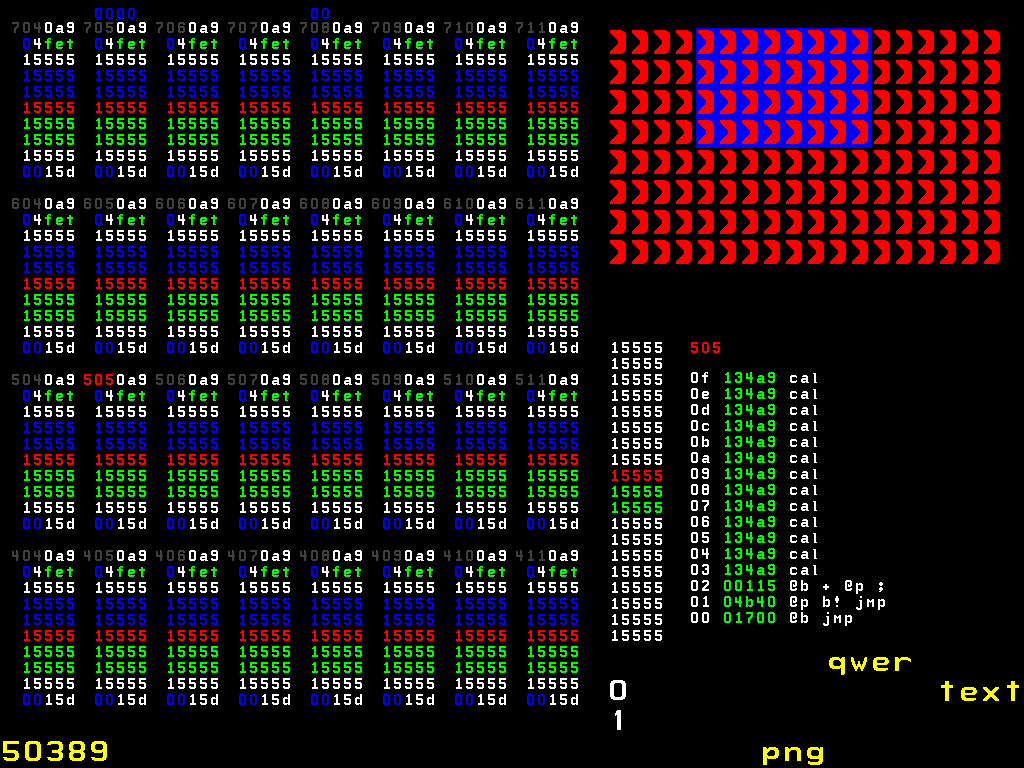
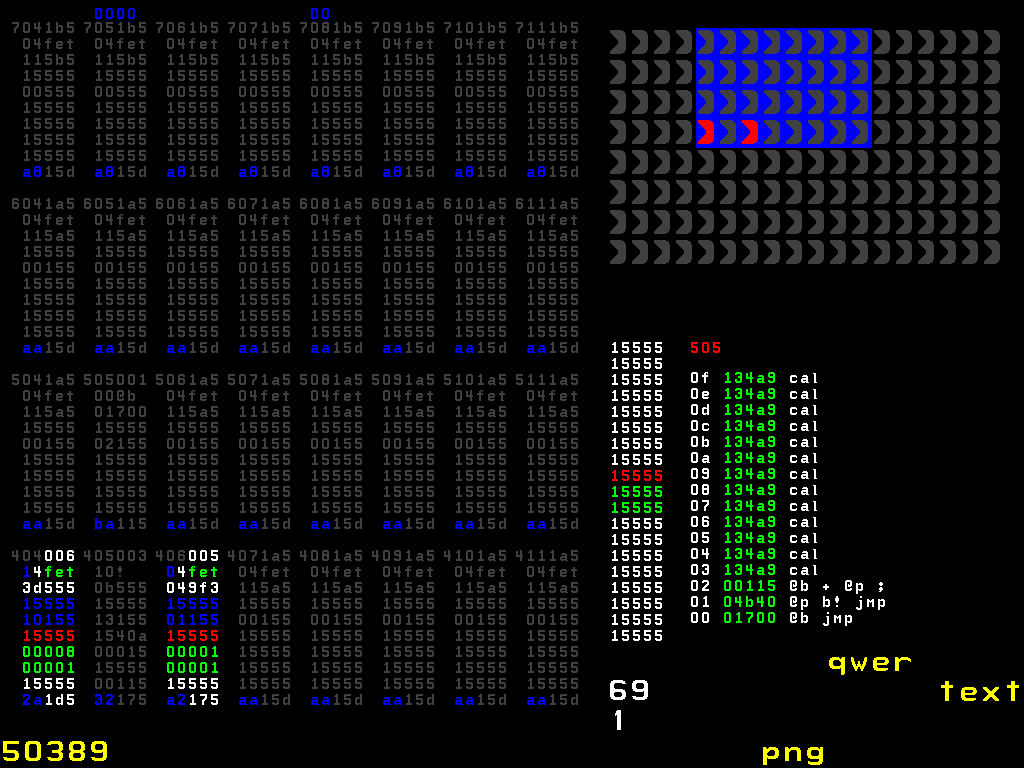
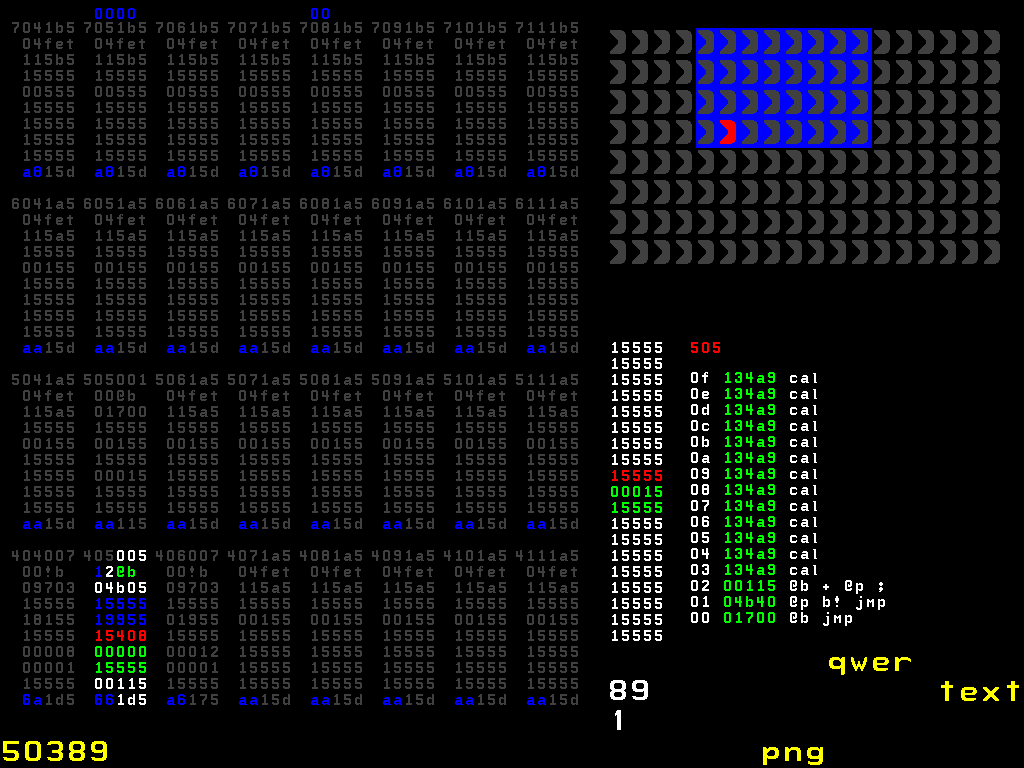
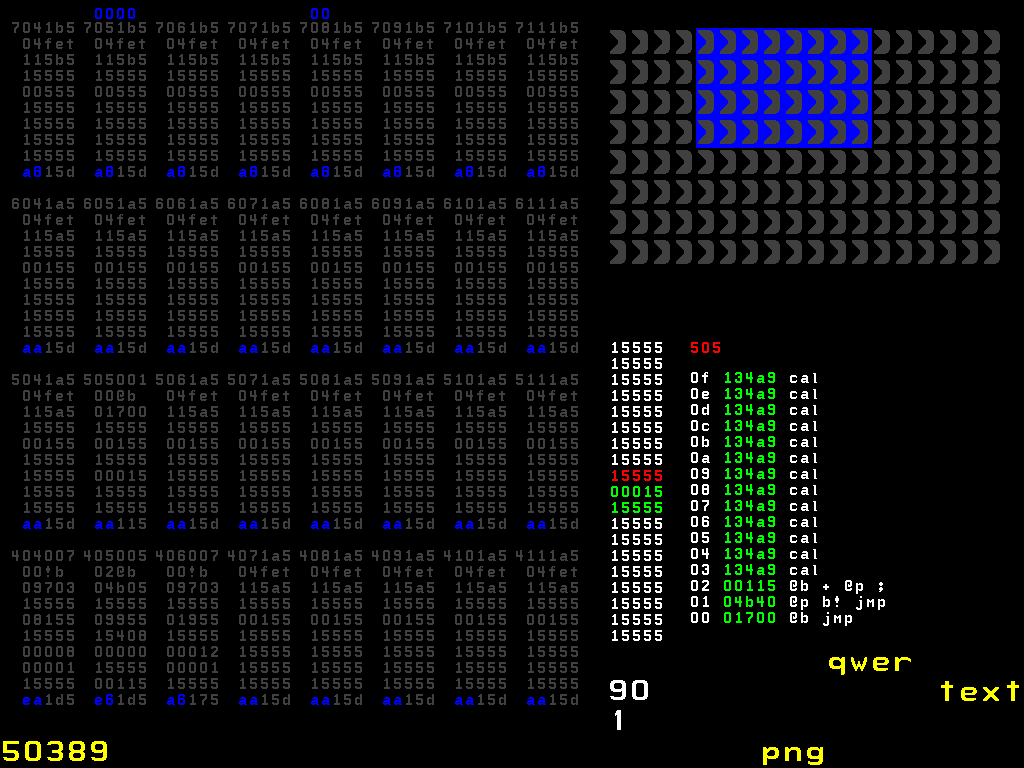
The 8x18 = 144 packman characters in the upper right corner are the nodes.
The blue rectangle contains 32 nodes.
These 32 nodes are visible in the upper left corner.
With the upper ludr keys you can move the rectangle.
There will be selected an other group of 32 nodes.
For the active nodes the packman characters are red.
Here you have got information about amongst other things the stacks and registers
of 4x8 = 32 nodes.
The first three numbers in the upper left of each block are the number of the node.
The three numbers in the lower right are the b-register.
The five number in row above the b-register represent the a-register.
The upper row off green numbers is the top of stack.
The row below that is the second of stack.
For more information you can find a link about the simulator at
"Links to more related information..."
In the lower right corner under the 144 nodes you can see a red number representing the node that has focus at the moment.
The ludr keys in the middle move the focus to another node.
Before testing our program node 505 needs to have focus.
Use the middle ludr keys for this purpose.
Make visible the next nodes in the block of 32 nodes:
505
404 405 406
Use the upper ludr keys for this purpose.
Executing the next step ("clock cycle") is done in the simulator with the f{s} key.
The best magnitude for every step of this simulation is 1.
So you can execute the simulation by pressing the f{s} key a number of times.
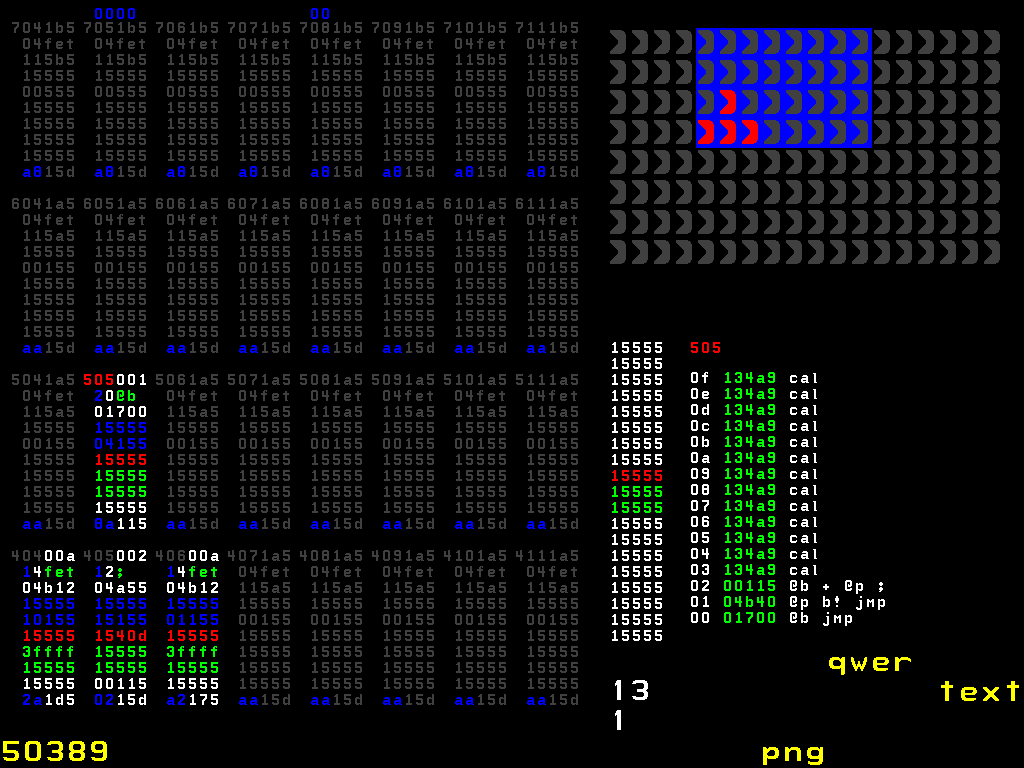
Below you can see in some pictures, how the simulation looks after a certain number
of steps in time.
This simulation shows the strenght of the GA144:
Doing several calculations in parallel.
It is marvellous that all this happens in one small chip.
Complete source in html. Nice!
Type: 176 <space> load <space>
Type: 0 <space> 1440 <space> .html <space>
The file "cf.html" is created containing block [0..1339].
The colors white and black are reversed.
"Index file". A table of contents.
Contains only the headers(first lines) of the blocks.
Type: 76 <space> load <space>
Type: 0 <space> 1440 <space> index <space>
The file "OkadSim.log" is created containing headers for block [0..1339].
Generate a png file of the current screen.
Type: png <space>